
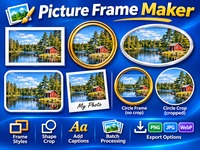
Picture Frame Maker
Picture Frame Maker lets you create beautiful photo frames, shape borders and ready-to-share images for free. Choose from classic, double, circular, oval, rounded, Polaroid and shadow styles. Customize colors, frame thickness, corners and shadows, add captions, crop photos into different shapes, and choose ready-made sizes for social media. Process up to 100 photos in one batch and export as PNG, JPG or WebP. All image processing takes place locally in your browser.
⚠️ Important: When extracting your downloaded ZIP file, always choose a separate folder. Although the tool adds a filename suffix by default, make sure you do not overwrite your original photos.
GOODIETOOLS · IMAGE TOOLSPicture Frame Maker
Create beautiful photo frames, shape borders and ready-to-share images. Your photos stay on your device.
Live previewYour frame will appear here Your framed photo will appear hereAdd an image to begin designing.Live preview · Original files are never changed—New to photo frames?Choose a preset such as Classic White, then adjust the frame thickness and color. Your preview updates automatically.
Tutorial
1. Open Picture Frame Maker
Open Picture Frame Maker to start creating framed photos. The tool works directly in your browser, so you do not need to install additional software or create an account.
You can add custom frames, adjust colors and borders, apply different image shapes, add captions and export your finished photos.
2. Upload your photos
Click Choose Photos to select images from your computer, or drag and drop them into the upload area.
You can add up to 100 photos at once. Each image can be up to 30 MB.
3. Choose a frame style
Select a frame style to change the appearance of your photos.
The available styles include:
-
Solid Frame: Adds a simple solid border.
-
Double Frame: Creates a frame with two borders.
-
Circle Frame: Adds a circular frame around the photo.
-
Oval Frame: Creates an oval frame.
-
Rounded Frame: Adds rounded corners.
-
Polaroid: Creates a classic instant-photo appearance.
-
Soft Shadow: Adds a soft shadow effect.
-
Decorative Frame: Applies a decorative border.
-
No Frame: Removes the frame.
4. Customize your frame
Adjust the appearance of your frame using the available customization controls.
You can change:
-
Outer and inner frame colors.
-
Frame thickness.
-
Inner border thickness.
-
Corner radius.
Advanced Mode also provides individual thickness controls for each side, along with shadow blur and opacity settings.
5. Choose an image shape
Choose how your photo should be displayed inside the frame.
Available options include:
-
Keep Original Shape: Preserves the original image shape.
-
Circle Crop: Crops the photo into a circle.
-
Oval Crop: Crops the photo into an oval.
-
Rounded Rectangle: Creates a rectangular image with rounded corners.
You can adjust the corner radius and enable transparent areas outside the selected shape when exporting as PNG or WebP.
A circular frame and a circular crop are different. A circular frame can surround a rectangular photo without cropping the original image.
6. Add a caption
Enable Add a Caption to place text below your photo.
Customize the caption text, text color and font to create a personalized result.
7. Choose your output size
Select a predefined output size or enter your own custom dimensions.
Available presets include:
-
Instagram Square: 1080 × 1080
-
Story: 1080 × 1920
-
Social Post: 1200 × 630
-
Header: 1500 × 500
-
Profile: 400 × 400
Choose Fit to display the entire photo or Fill to crop it to the available area.
8. Preview and export your photos
Changes appear in the live preview as you customize your design.
Use Undo, Redo and Show Original to review your changes and compare the result with the original photo.
When your design is ready:
-
Choose PNG, JPG or WebP.
-
Adjust the image quality.
-
Optionally add the
-framedfilename suffix. -
Click Create Framed Images.
Download individual images or use Download All Images (ZIP) to download the complete batch.
9. Keep your original photos safe
Original files are never modified. All image processing takes place locally in your browser.
Always extract ZIP downloads into a separate folder rather than over your original photos.